Serverless is a software architecture where the code runs in the cloud but we don’t really know the OS and the hardware it uses. Everything is managed by the provider except the functions we upload.
The first Function as a Service (FaaS) was created by hook.io in 2014, followed by Amazon with the name AWS Lambda. After that, other providers started their similar services. Now we can access FaaS from AWS, Azure, IBM and Google and from other smaller providers.
Serverless is not just an architecture. It is also a powerful framework we can use to develop and deploy serverless applications. After reading this guide, you will be able to deploy infinitely scaling NodeJS web application in minutes. Other supported languages are Java 8, Python 3.6 and 2.7, .NET Core 1.0.1 (C#)
Feel free to jump to a specific part of this post:
Why Serverless Architecture?
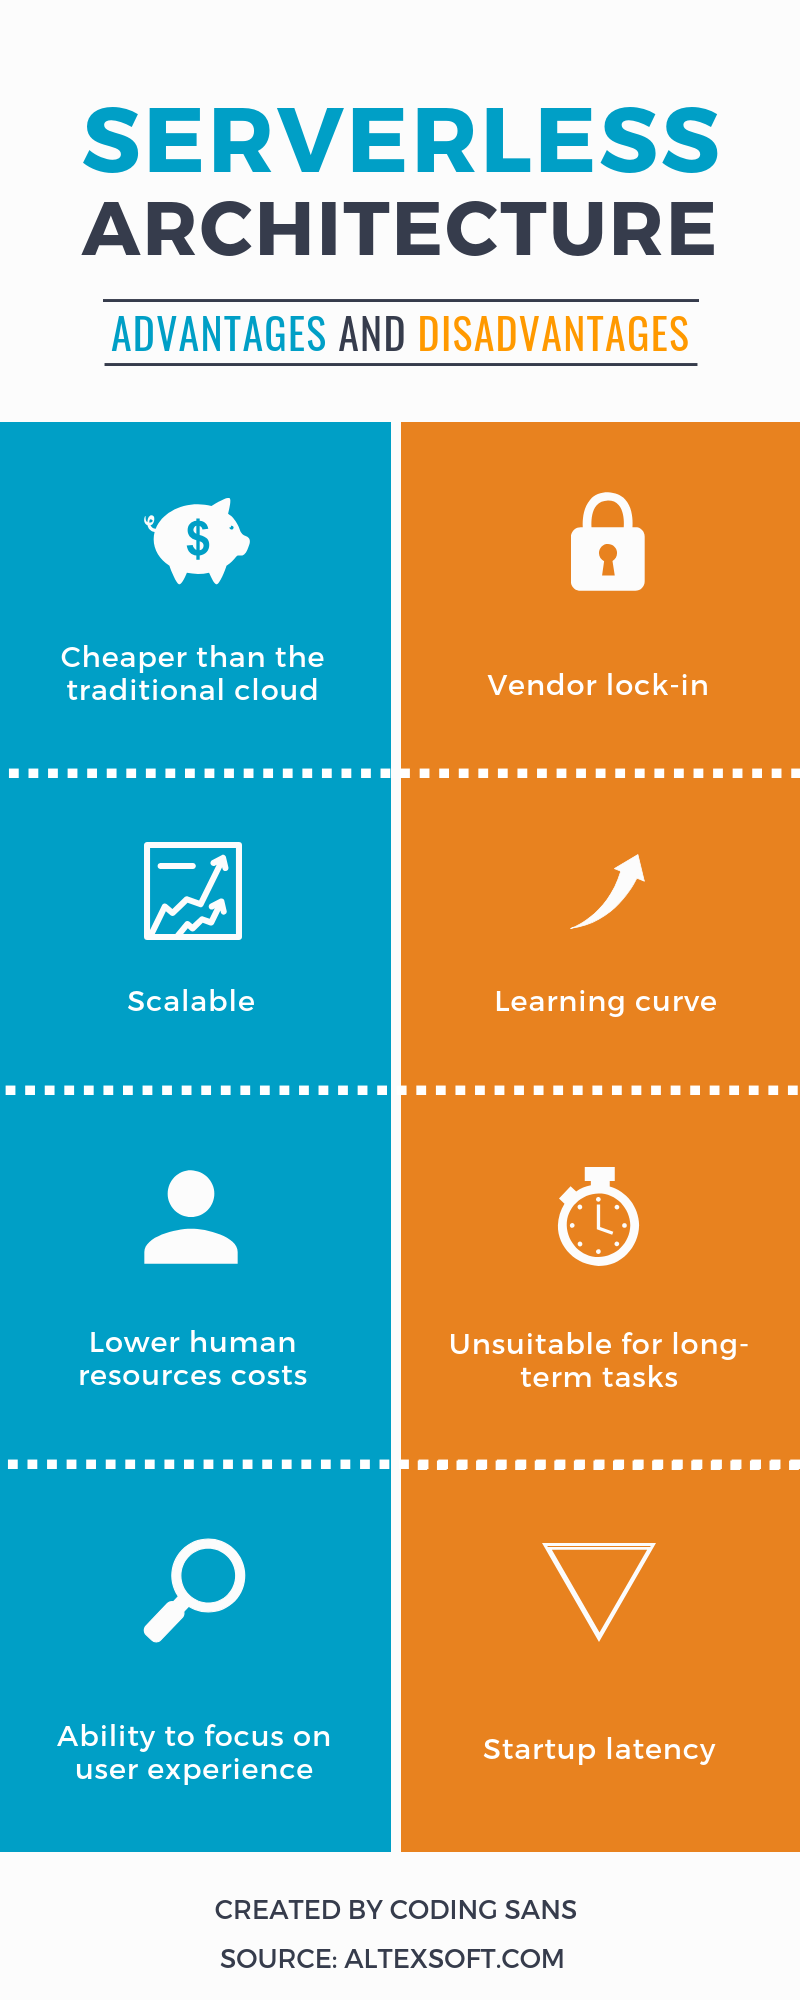
If we underestimate the load on our servers, we might get in trouble for providing bad user experience caused by server breakdowns or huge response times. But if we overestimate it, we throw out money on unused process power, and nobody wants to do that. With serverless we have infinite scaling on our functions, and we only pay for the actual usage.
To achieve the insane scaling, each function is run in a different container. They might be on different machines too! Their lifecycle is super short. Once a triggering event happens, a container with our function is initialized, our code is executed, and after some time, the container is gone. We cannot use the underlying server to store the application state, file or anything else!
Click here to learn all the serverless trends you need to know!
Getting Started with Serverless Architecture
I use the term functions instead of apps when I talk about scaling. Why is that? Technically, all we upload to our provider is a group of functions. Each function representing a nanoservice, one single atomic task, our server does, like an endpoint in a “classic” HTTP server.
To create your first serverless project, I highly recommend using the serverless framework; I will use that too. You can install it via npm, with the following command.
npm i -g serverless
This will install the package globally, so you can use it from your terminal. It not only helps you with deployment; you can also generate a skeleton, containing a simple function with a simple one-liner.
serverless create --template aws-nodejs --path my-service
Please note, this template is for AWS. To use other provider serverless supports, please use azure-nodejs, openwhisk-nodejs, google-nodejs.
The command should create a new folder and some files in it for you to get started with. The first file we should inspect is serverless.yml. It is a descriptor file for the framework to know what to deploy and where. Besides a lot of comments to help you out, it has the following content:
service: my-service

provider:
 name: aws
 runtime: nodejs6.10

functions:
  hello:
    handler: handler.hello
As you can see, we have a service, and it is the same we provided at the --path flag. By default, we have one function only that will be deployed to AWS and will be run using node version 6.10. Currently, it is the latest available Node version, but later LTE versions will always be available, but with a delay. Now let’s inspect our hello handler.
module.exports.hello = (event, context, callback) => {
 const response = {
   statusCode: 200,
   body: JSON.stringify({
     message: 'Go Serverless v1.0! Your function executed successfully!',
     input: event,
   }),
 };

 callback(null, response);

 // Use this code if you don't use the http event with the LAMBDA-PROXY integration
 // callback(null, { message: 'Go Serverless v1.0! Your function executed successfully!', event });
};
It is just an exported function that will handle the event. It will return a 200 status code, and a string in the body. But how do you call this function? What is an event?
Configuring Our First Serverless Project
The created function is not hooked to any event at first; we have to tell the framework exactly what event we want to listen to with our event. Now, for demo purposes, I want it to be triggered by a HTTP GET request. So I modified my yml to look like the following:
functions:
 hello:
   handler: handler.hello
   events:
     - http:
         path: hello
         method: get
Once we deploy the application, the function will be available at the {{server}}/hello route. To achieve this, serverless will fire up an Amazon API Gateway to handle our HTTP requests. It also creates the hook between the gateway and our function, so we don’t even have to visit the AWS console. There are other events you might want to use. The serverless.yml file contains an example for most available event types commented out. It should be enough to get you started.
Deploying Our First Serverless Application
Now that we have a function that can be triggered, we should fire it up in the AWS cloud! First you have to configure serverless with your AWS credentials.
serverless config credentials --provider aws --key YOUR_KEY --secret YOUR_SECRET
After that, we have to run one single command.
serverless deploy
All the required resources specified in the serverless.yml file will be set up by serverless. Under the hood, it generates cloud formation and uses the aws cli. Once the deployment finishes, we get a list of our endpoints. And that is it; we have our first serverless application up in the AWS cloud. It was super easy and super fast. We don’t have to spend time configuring the infrastructure for our application, and that is a plus.
Adding a New Function
Now that we have our dummy project in the cloud, we can create some additional functions. A real-world application will most likely run in a Virtual Private Cloud (VPC) to protect its resources like DB or memory cache. So it might be important to run our functions inside that VPC. We can achieve it by changing the serverless.yml file.
service: my-service
provider:
  name: aws
  vpc:
    securityGroupIds:
      - securityGroupId1
      - securityGroupId2
    subnetIds:
      - subnetId
If you want, you can overwrite service level VPC configuration by adding the same structure to a function. Let’s say we are working on a weather app, and we need to store a third-party API-s data to a DB so we can analyze them later.
The DB is inside a VPC, so you need a subnet in that for the lambda functions. Creating a new subnet for them is wise, since lambdas are just functions; to give them an IP inside a VPC, you have to assign them to a subnet with internet gateway connected. And if you want to call for external resources like a third-party http service, an IP address will be required.
Since we want to execute the function periodically, we can’t use HTTP trigger this time. For this demo, I put the code on the same handler.js file, but in a real scenario, you should probably structure it to a different file. So the updated serverless.yml looks like the following.
functions:
 hello:
   handler: handler.hello
   events:
     - http:
         path: hello
         method: get
 getWeather:
   handler: handler.getWeather
   events:
     - schedule: rate(5 minutes)
As you can see, we used the schedule event trigger, which will execute our function every 5 minutes. Our function can look like the following.
module.exports.getWeather = (event, context, callback) => {
 request.get('your_weather_query')
 .then((body) => {
   return Weather.create({ weather:body, date: new Date() });
 }).then(() => {
   callback(null, { success: true });
 }).catch(err => console.log(err));
};
This function will send a request using an HTTP library like request-promise and store the response in a weather mongoose schema. The data can later be used by either an application running on a server or another serverless function.
You might recognize that all I did with the error was log it to console. But where is our console in this case? Well, AWS has a service called CloudWatch. This service stores the logs of the lambda functions. You can view it on the AWS console, or by the serverless CLI tool, with the following command:
serverless logs -f hello -t
This will open a new tab in your terminal, and stream the log to your computer for the function specified.
As you can see, you can either go full serverless, but if you already have a cloud-based application, you can add new, serverless parts to it. But is serverless perfect?
Disadvantages of Serverless Architecture
Cold start: Remember when I summarized the life of a lambda function? It starts with initializing a container if the function was not called for a long time. And this can take up a lot of time, maybe even seconds!
Time limit: A lambda function can run for up to 3 minutes, so working with bigdata or other time-consuming operations is just not possible with AWS lambda.
Database connections: Since all of our functions run on a different container, you can’t create a singleton of a database service. Every function will have its own connection to your database, and that might cause some troubles on performance.
No power over your infrastructure: You can configure your containers RAM from 128mb to 1536mb and that’s it. You might need more, you might need some software to help out your functions, but you can’t install it. So, having your infrastructure managed by the provider can be comfortable, but it also binds your hands.

When Should You Pick Serverless?
Developing an application using serverless is super fast and easy, so if you are planning to create a PoC or an MVP project or if you don’t want to spend time or money on managing your infrastructure, serverless can be a good choice.
But if you want to do long calculations with high memory consumption, you should look for other solutions. Also having a serverless application locks you to the cloud. If you have to move to a private server, even if it is possible, with serverless offline, it probably is not an optimal solution.


